Face Rendering: Specularity, Subsurface Scattering, & Raytracing
Part 3 - Raytracing vs. raymarching
As the 3rd part of my quest for human skin rendering domination, I focused on researching the rendering methods of raytracing and raymarching and how one would implement them in Unreal Engine 4.

Ray marching
Ray marching tests how long a ray travels through a medium that is contained within a domain.
This technique effectively shoots rays through each pixel and tests them at intervals within a domain called a Signed Distance Field (SDF). For skin rendering this technique allows us to determine the amount of material that light has passed through to reach that point on a surface allowing us to better approximate the amount of of light penetration. It has the added benefit of being possible to implement in a pixel shader.

The wrinkles…
This technique requires a volume texture of the head similar to this image that maps to the volume of the SDF. Although theoretically possible to recreate a volume texture procedurally the steps involved require closed geometry which is no easy task with our problem set.
Additionally, it is difficult to calculate light at a point in space in UE4’s material editor as many of the lighting calculations are obfuscated behind what are called shading models. This structure has allowed Epic Games to develop a robust artist facing material editor at the cost of extensibility.
This bit about shading models is doubly important, as it is also relevant for implementing ray tracing.
Ray tracing
The common approach to ray tracing is to shoot a ray through each pixel of a frustum and if it hits something to get the color of the object at that point. For shadowing a ray is then sent from that point to each light which might be lighting that pixel. If something is in the way of that ray’s path to the light we know that that pixel will be shadowed and can affect the base color of the original hit accordingly.
From the research that I have been able to do by snooping in the UE4 source code it seems that most of the ray traced effects in current versions of UE4 (4.24.1 as of this writing) use a common ray format that is a finely tuned package of data that can be moved and edited as fast as possible. Since it would be limiting for Epic Games to make these shaders GPU specific forever I conclude that this approach could be made hardware agnostic, it is simply limited to Nvidia’s top of the line GPUs at the moment for playability rather than because of actual hardware specificity.
I believe that a method for ray traced subsurface scattering could be achieved in UE4 by recreating or modifying the already present ray tracing techniques in UE4.24. A technique like that used by EA SEED (see Part 2 of this series) could then be used in UE4 but would require a new shading model to allow for lighting calculations to be performed at the hit locations in preparation for a final gather. This would also possibly require a denoise of the gathered luminances before the application of specularity.
Part 2 - Subsurface Scattering
After getting some direction from an expert in the field, I started work on SubSurface Scattering(SSS). I looked into a few different techniques including: sampling a cubemap and applying SSS with pre-integrated falloff sampling, and ray marching.
Cube-Map Sampling
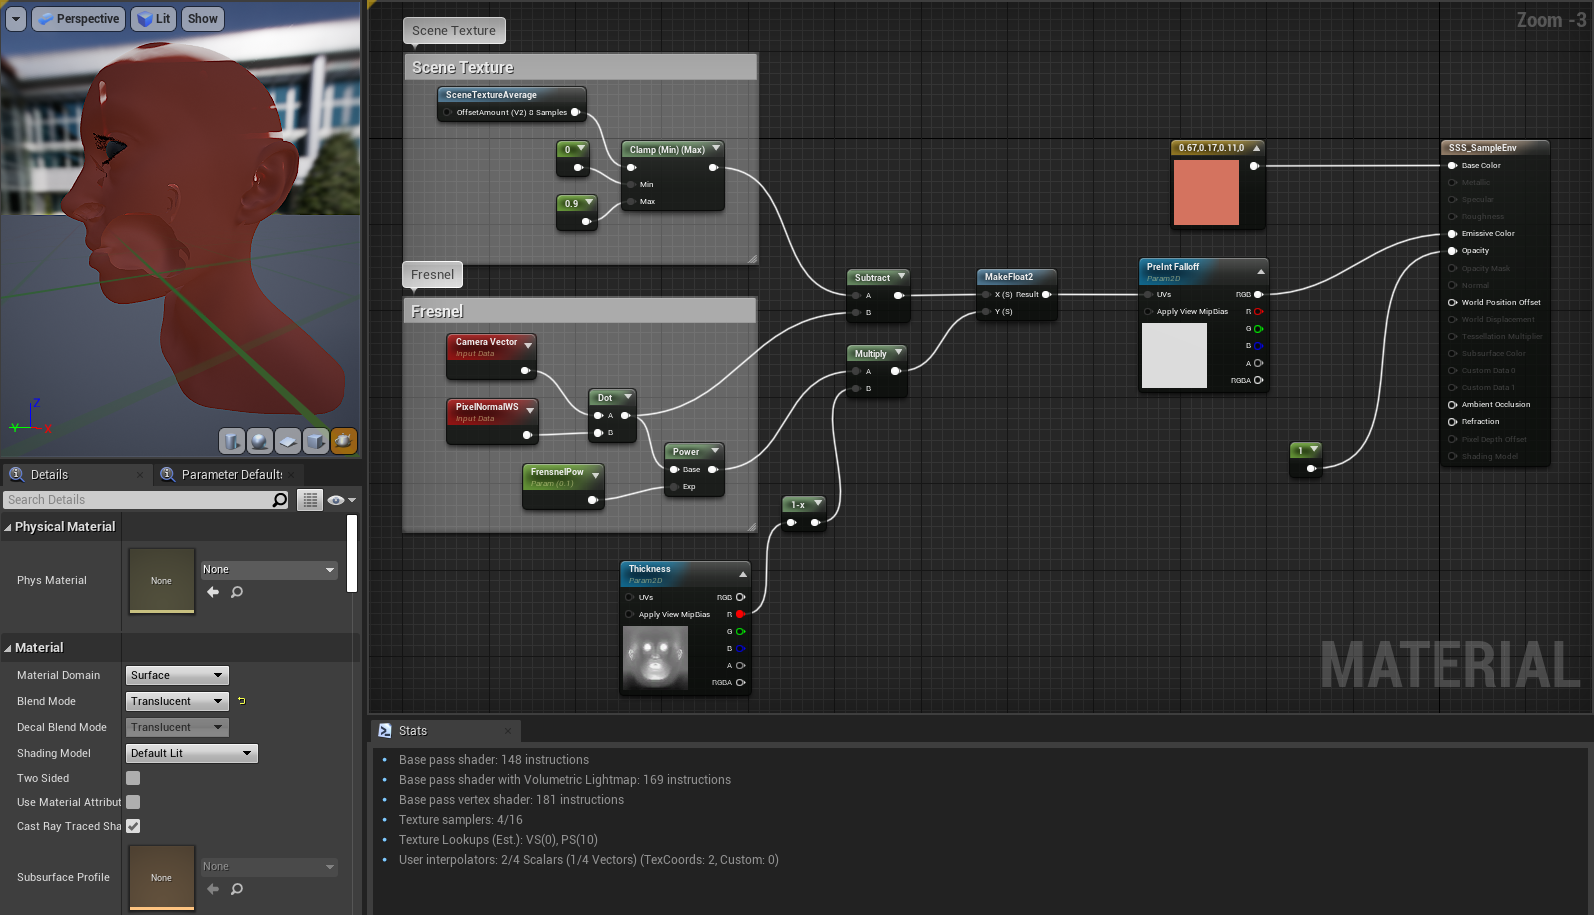
Originally I had gone about SSS by sampling the scene texture, which allowed me to get my head around the problem but had many issues: it forced the object to be in the translucent queue, only took into account light that was behind the object from the camera’s perspective and removed shadow casting by the object. After that I began implementing a version which used a cube-map scene capture.

Pre-integrated SSS
First up was scene texture sampling. I was advised to look at sampling from a reflection probe, environment map or other similar spatially placed entity. I began by sampling the scene texture. After getting the scene texture I grabbed the pixel normal to allow a fresnel-centric application of a pre-integrated penumbra texture. This texture is a computation of the diffusion of light in a scattering material at the edge of light falloff. More on that here under “Pre-integrated Subsurface Scattering”. However; this version of the technique is limited to light that you are looking at through the skin, not the whole scene.

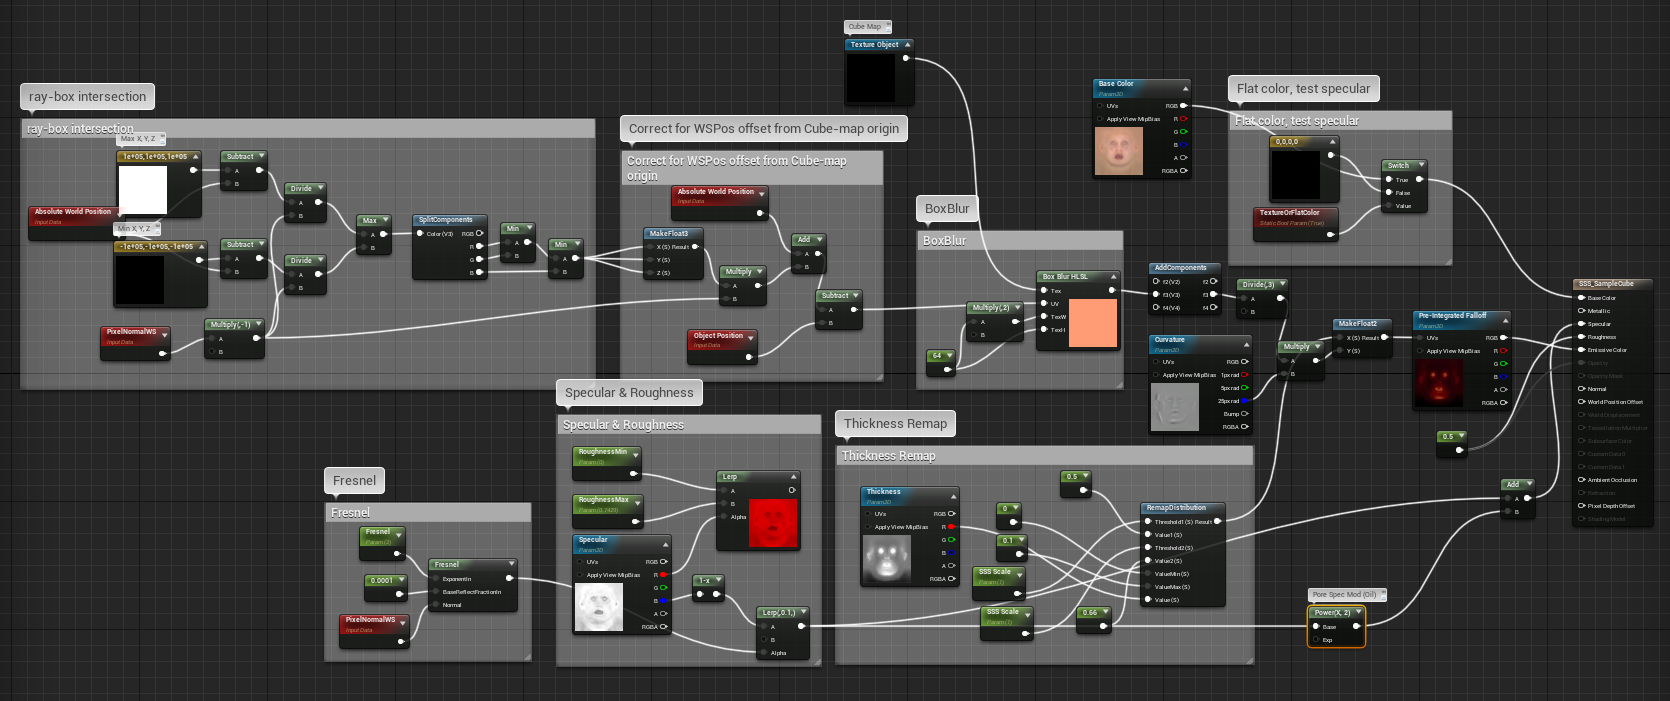
Cube-map to SSS
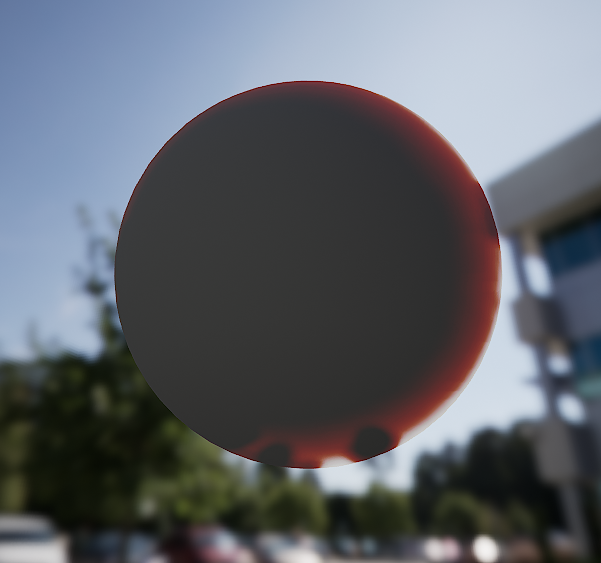
Here we can see the SSS technique of sampling the cube-map. Usually used for calculating reflections, the map is captured from a node placed in world-space. From this map we can gather the lighting information behind an object. We can place this node at the head, for the most correct capture of the scene. From there we can approximate the light passing through that point by sampling a blurred cube-map in the opposite direction of the pixel normal. After gathering this sample of color behind the pixel normal, we can use the pre-integrated SSS LUT to control the effect the sample has based on how brightly lit that mesh point is on the outward side. As you can see this current iteration of the material does not take into account dynamic lights; they can only affect the SSS if reflected off another object into the cube-map. This technique also does not take into account the thickness at the mesh point behind that pixel normal. This causes significant light bleeding as seen in the eyelids especially.
Ray Marching
To get rid of this bleed I believe the most accurate method would be to use a ray trace to sample the luminance, thickness, and distance to that point on the mesh opposite the pixel normal being rendered.
float accumdist = 0;
float3 localcamvec = normalize( mul(CameraVector, GetPrimitiveData(Parameters.PrimitiveId).WorldToLocal) );
float StepSize = 1 / MaxSteps;
for (int i = 0; i < MaxSteps; i++)
{
    float cursample = Texture2DSample(Tex, TexSampler, saturate(CurrentPos).xy ).r;
    accumdist += cursample * StepSize;
    CurrentPos += -localcamvec * StepSize;
}
return accumdist;
The above snippet is HLSL modified from Ryan Brucks’ series on Ray Marching. This code performs similar to a ray trace but uses interval testing to determine the thickness of media along a ray based on the number of tests that occur inside the media. This is instead of testing if/when it hits and performing more expensive computations as in traditional ray tracing algorithms. I used ray-marching even though UE4 has added real-time ray tracing because of the limitations of my at-home hardware setup. My hope is that by garnering an understanding of SSS algorithms using ray-marching I can later apply the same concepts with UE4’s ray tracing support.


I moved forward with the idea of partially emulating EA SEED’s work in using real-time ray tracing for translucency (See gallery at left). I figured I could use a similar approach to theirs but replace the ray tracing with ray marching.
With all of this research and testing I began to formulate a hypothetical method that I could then work on implementing. I decided that a hybrid approach might produce the best results. From pre-integrated sss we get fine detail that is easy to apply in the pixel shader. From ray marching we get correct luminance at intersecting points. Below I have written out the method I have hypothesized and begun work on. The biggest issue currently is writing a new shading model. The UE4 Editor does not take easily to such things, and it is a much less documented feature/workaround of the engine.

Proposal
1. Flip normal at pixel and push inside slightly
2. Use thickness map at pixel to determine length of ray
3. Ray march along that entire length for intersections
4. Compute luminance at those intersections
5. Gather luminance based on distance from original point and number of layers passed through (see right, that’s a real ear not a render by the way)
6. Choose color using curvature map and pre-integrated falloff
This technique could possibly allow for: lighting of surfaces through others (see ear), and more physically correct scattering by taking into account the density/thickness of the material (which the publicized EA SEED method does not do.
Potential Difficulties
By virtue of being an amalgamation of several techniques, this proposal is quite complex. It also presents the need for writing a new shading model within UE4 in order to perform lighting calculations ourselves; not impossible task though it does require a re-implementation of a physically based shading model specifically for translucent media.
In conclusion
I will be continuing work on this but wanted to give an update. I’ve learned and refreshed on a whole lot of graphics math which is super fun. At any rate thank you for reading!
Part 1 - Specularity


Research
First I downloaded The Wikihuman Project’s Digital Emily 2.0 mesh and texture pack. For use in engine I decided to downsample the textures to 4K from their standard 8K for ease and speed of iteration. Next I implemented them in UE4 using Epic’s tutorial for their photorealistic human skin pipeline. After completing this and reading through some of the associated papers I gained a much greater understanding of the techniques involved in skin rendering. After implementing the built-in pipeline I began the process of breaking it down into its component parts to later build in the different approaches that might work better in given situations.
Breakdown
Through this research, the lion’s share of which was informed by Next Generation Character Rendering as well as An Intro to Real-Time Subsurface Scattering, I felt that the most portable part of the many techniques used for face rendering was specularity. I came to this conclusion after seeing how subsurface scattering was most helpful in more dynamic lighting, whereas specularity was clearly visible in all situations. And, like how SSS hints at the underlying structure of skin, specularity approximates the surface; specifically the dull layer of the epidermis, & the shiny layer of oil that sits atop it. We do this with a 2 lobe specular formula.

Why Specularity?
Besides its ubiquity, focusing on specularity first has the benefit of being platform agnostic. The highest end techniques, namely Screen Space Subsurface Scattering (SSSSS) require the use of separate buffers to render properly. This means that they generally only work in deferred renderers. And if you’re trying to deploy to a mobile device, you’re generally stuck in forward. So by focusing on specularity now we can add SSS later once a platform has been chosen. And if we use a forward renderer, Pre-integrated SSS can still look great, use the same assets and can then be in a single pixel shader, rather than split off into its own screen space effect.
And above you can see where I lost a bit of steam. The “pores” are not contributing much to reducing the “plastic” feel of the skin. Getting 2 lobe specularity figured out is a challenge, and one that I haven’t surmounted just yet. But I am working on how one could render a lot of the detail of skin, specifically microstructures, with just proceduralism. My theory is that if one gathered the base color of someone’s skin from pictures, a la photogrammetry, and then overlaid high density procedural microstructure speculars you could get a good realtime digital representation of someone’s face. To be continued…